Project
Repository: github.com/JBourds/chrispy
Docs: jbourds.github.io/chrispy
This post talks about the motivations behind developing chrispy, a high-performance audio recording library for AVR microcontrollers. This library achieves sampling rates up to 54kHz with single channel 8-bit audio, 52kHz with single channel 10-bit audio, and around 17kHz per channel with two-channel 10-bit audio. This improves on our previous onboard recording solution by achieving a 68.75% greater sampling rate in a single channle 8-bit test. As far as I know, this makes chrispy the most performant audio recording library for AVR microcontrollers and the only one supporting multiple channels at once!
Motivations
I’m currently working on the CIROH project at UVM to develop low-cost systems for performing near-real-time detection of rain-on-snow events. These are weatherproof boxes containing a low-power microcontroller which gets powered by a rechargable battery. The microcontroller samples its sensor modalities at routine intervals and communicates readings to a gateway with a satellite uplink for sending data to the backend server. In order to detect precipitation, these sensors use a combination of meteorological and audio data as inputs to machine learning models. It’s infeasible to stream audio over a LoRa communication, and would be insanely expensive to send over a satellite data plan. Given these limitations, all machine learning is done on device. Optimizing the performance of these models is tricky for a few reasons:
1. Limited software ports exist from popular machine learning libraries. We could technically develop our own ports for models, but it would require a lot of time and so we would rather not. Popular libraries make training/deploying models simple. Unfortunately, it can be rather difficult to port models trained using one of these libraries into a form which can run on a microcontroller. The microcontroller code runs bare-metal so there is no OS, much less Python, to speak of. This means we’re limited to models which can be ported to C/C++ code to run on the microcontroller.
2. Limited resources. The ATMega2560 has 8KB RAM and 256KB program memory. For reference, a lot of modern front-ends load 5MB+ JavaScript alone. That is ~640 times as much JavaScript as we have RAM! Clearly, we won’t be running any large neural networks and so we need to make do with what we have. So far, we’ve seen the most success with random forest and SVM models.
3. Background noise. Our whole approach is currently based on detecting the sound of precipitation. Therefore, it’s really important recordings actually pick up precipitation sounds. Wind is pretty much the bane of our existence because it can totally overpower the sound of light to medium precipitation. As the saying goes, garbage in garbage out. In order to make our machine learning models successful, we need to do adequate data cleaning and feature extraction.
The primary motivation for this work is based on the last observation given above. In our first paper we were using a single mic recording audio with the TMRpcm library. This library worked great for us but had a couple shortcomings which made us consider alternatives:
1. Only used the bottom 8-bits of the 10-bit ADC, increasing quantization noise and decreasing SNR.
2. Only allowed for one channel to be recorded at once.
3. Maximum of 32kHz sampling rate.
4. Had strange non-linear behavior at specific sampling rate thresholds where audio would “speed up” or “slow down” a lot.
The author of that library has another libray which claims to fix these shortcomings but I personally couldn’t get it to work on our board. The library wasn’t originally designed for AVR, and so support for it is still ~experimental~.
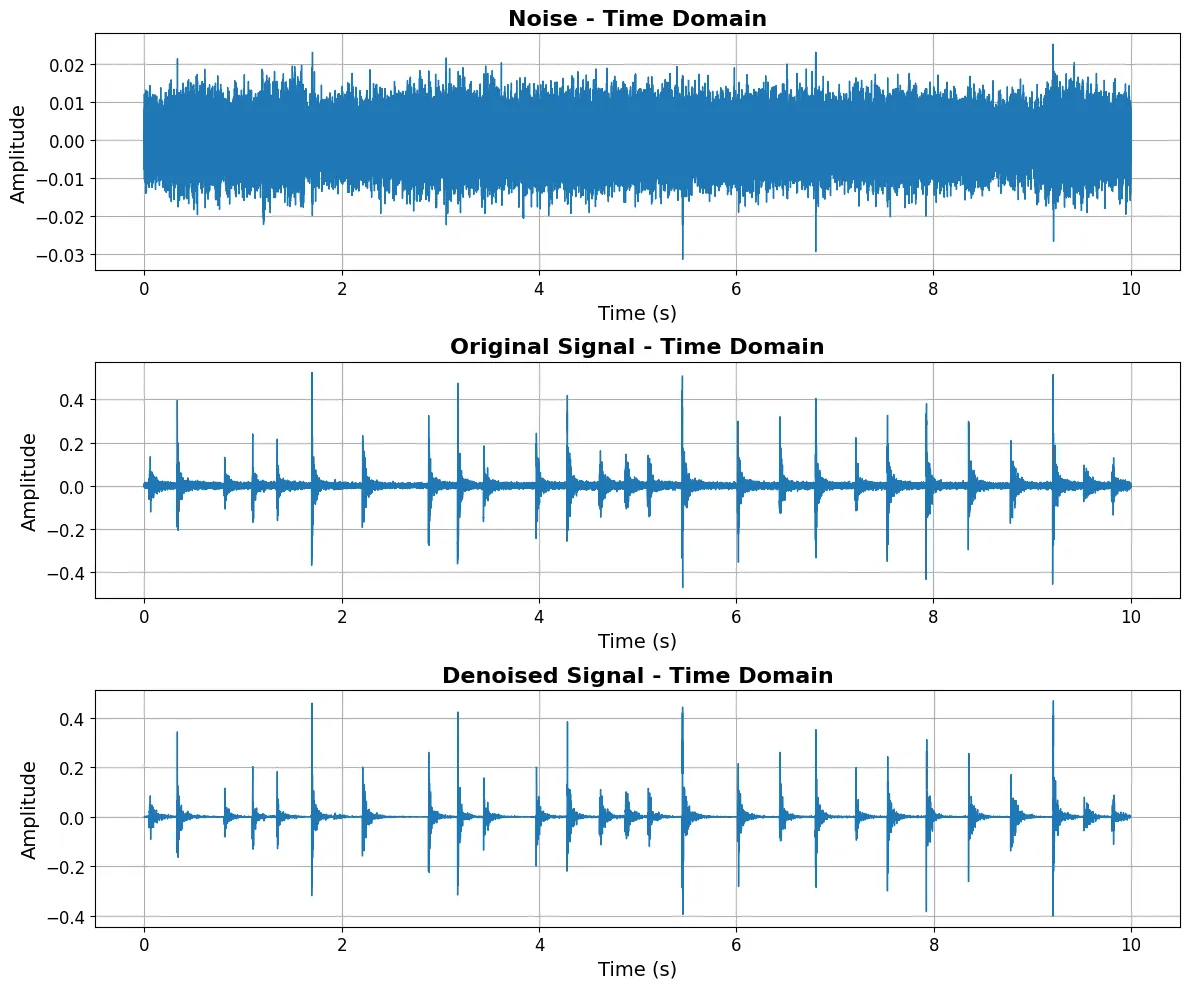
In an effort to improve the input data quality for our machine learning models, we wanted to upgrade our audio recordings to 10-bits and experiment with noise cancellation techniques. One approach we formulated for this involves spectral subtraction. Without diving into nitty gritty details of signal processing, the intuition for this approach is if you have one recording with noise, another with the same noise plus the signal of interest, then subtract the first from the second, you’ll get a signal with much of the noise removed from it. Below is a picture of this being done with a signal (some rhythmic tapping) into one mic and a wind noise being played into both mics. As you can see, our denoised signal has a lower noise floor (less “fuzz” around x-axis) which corresponds to an improved sound quality.
From what I could tell after scouring repositories, there was nothing made for AVR microcontrollers which could meet these requirements. This drove me to investigate creating my own solution. After a couple weeks of development and debugging, I came out with chrispy! Now that all of the context and ceremony out of the way, let’s dive into the detailed design!
Design of the Chrispy Recording Library
Initial Design
Going into this project I had a pretty solid mental model of the general shape of the problem. I knew hardware timers would be required in order to sample precisely at a user-defined rate. The ATMega2560 has two 8-bit and four 16-bit hardware timers. Using the 16-bit allows for greater precision when setting the prescaler and compare/match values, so I went with a 16-bit timer. I would also need to configure the ADC to use the timer as a trigger, set it up to read from the proper analog pin(s), and write an interrupt handler which places samples into a buffer. The ADC has a theoretical maximum trigger frequency of 76.9k samples per second, but I knew the actual amount of data ingested would be less due to the expensive flushes to disk when the buffer fills up. Even with a double-buffered design, if the ADC is clocked at its maximum speed the entire processor bandwidth is spent in the interrupt handler and there is not enough time to ever finish flushing samples to disk. The most interesting part of designing this library to me was figuring out how to support concurrent sampling across multiple channels and get as close to the theoretical maximum.
Design Process
As all good embedded projects do, I started by cracking open the datasheet for my hardware. While I knew generally what I would need to do from a book I had read covering many typical embedded systems concepts, I needed to know more about the hardware interface for the ATMega hardware timer and ADC. After some careful reading, I set a couple milestones for stages of the project (listed in approximately sequential order):
1. Be able to serialize audio data in the WAV format.
2. Setup the ADC with a hardcoded configuration and make sure we can get an interrupt.
3. Write code to configure hardware timers for precise sampling.
4. Develop API for ADC interface to configure channels/sampling rate and retrieve samples.
5. Recording interface for specifying channels and associated filenames to record to.
6. Add support for multiple channels
7. Optimize!
Detailed Design
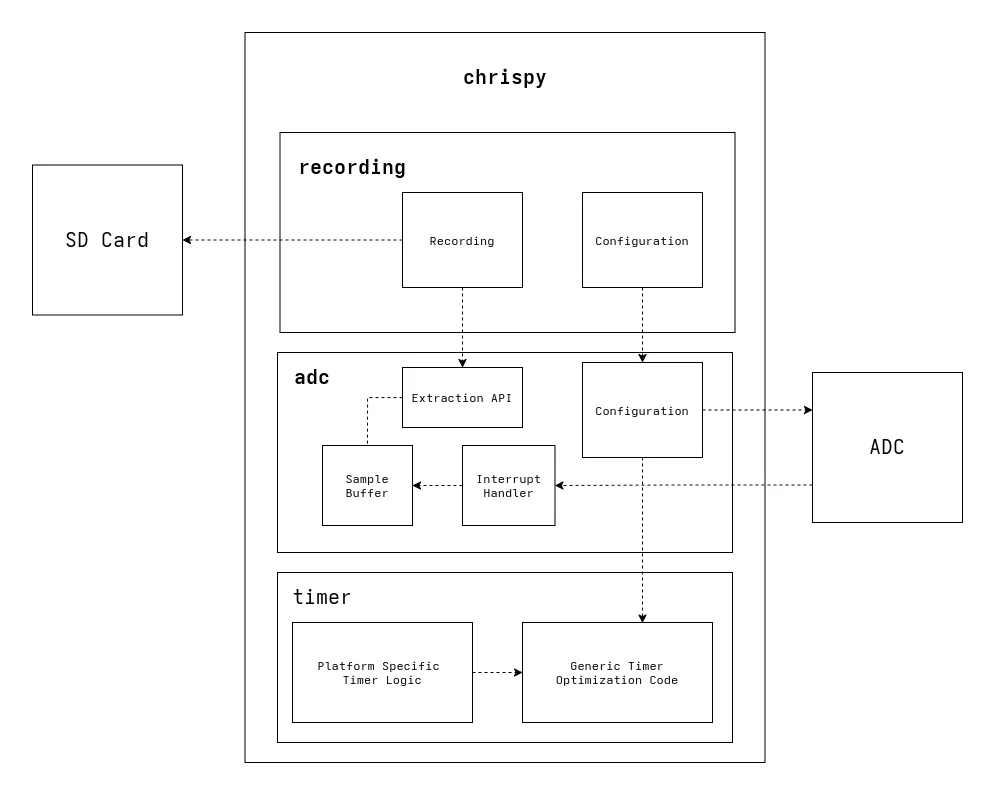
The design of this library is broken into three layers for the timer configuration, the module interacting with the ADC, and the recording module built on top of it. These are laid out in a traditional layered monolithic architecture. A high-level overview is given below.
Timer Module
The timer module is the lowest layer and is further subdivided into the platform-agnostic and AVR-specific components. The platform-agnostic logic does all the computations for determining the best possible values for a prescaler register and compare/match value, given an input frequency and the desired frequency. Separating this logic from hardware details like specific registers keeps this module generic. Some benefits from this are:
1. I could easily test all the logic on a host PC rather than on board a microcontroller, leading to quicker iteration cycles.
2. The code is generic, making it reusable across parts of the program which may have different timer interfaces but require the same process of optimizing a timer configuration (e.g., Setting the prescaler value for the ADC).
The AVR-specific timer configuration uses this generic functionality to set a specific 16-bit timer up for sampling at a given rate.
ADC Module
This is the real meat of the library and is where most of the business logic exists. The ADC module is responsible for configuring the ADC to run at a given sample rate for every channel it is configured with, rapidly ingesting samples, and providing an API which allows any higher-level modules to quickly collect samples.
Two timings must be configured for the ADC.
1. The hardware timer for triggering the ISR which does sampling. This is
handled by configuring the AVR hardware timer to sample at a rate of
Number Channels x Per-Channel Sample Rate.
2. The ADC must receive a high enough clock rate to always have a sample ready when the timer interrupt is triggered. This functionality reuses the timer module’s logic for finding the best prescaler value.
A “channel” in this sense corresponds to the analog pin being read from, and optionally some information about the power pin (pin number and whether it is active low/high) to ensure the channel is active during sampling. The ADC is configured with the channels to read from, per-channel sample rate, and how many samples to retrieve from each channel before jumping to the next. For audio recording, I found a window of 1 sample to be optimal as more than that lead to audio distortion.
Also during initialization, a buffer is provided which gets divided into two buffers with further subdivisions for each channel. While having this two-level buffering approach makes the logic more complicated, it is a necesary complexity. The double-buffered approach is essential because otherwise there would be periods of time immediately following the buffer becoming full where it is unavailable to receive new samples due to being busy writing to disk. The same idea holds for why each of these buffers needs to be further split up into buffers for each channel. If samples were interleaved within a single buffer, one of two things would need to happen:
1. Separating interleaved samples when writing out to disk. This is super slow because it involves many small writes to the SD card. If 512 samples could fit in the buffer and we are recording concurrently from two channels, every other sample would need to be written to disk in its own disk IO. This doesn’t make efficient use of the 512-byte buffered IO provided by the SdFat library and takes so long to do it would result in samples being dropped.
2. If we didn’t interleave disk IO and instead wrote all the samples out together we could then split them apart afterward as a post-processing step. This is totally doable, but requires time-consuming additional work which could be an issue if there are high-priority tasks waiting to be completed.
Although it complicated the implementation, keeping track of a buffer for each channel allows us to perform efficient buffered IO during recording and requires no cleanup work afterward. This is a big enough benefit to warrant the pain of getting it right.
So we’ve gone through the struggles of shaping our data for easy exfiltration. Now what is a good interface for leveraging this?
I came up with a design involving “loaning” out pointers to the start of channel buffers to calling code along with the channel index and number of bytes in the array. Once a buffer has been filled with ADC samples, all of the channel buffers within it are eligible to be loaned out. After a pointer has been handed to calling code, that code will do whatever it needs to with it (e.g., Writing recordings to a file) then call the function again with the pointer once it is done with it. Receiving a pointer back through this function lets this module mark that buffer as free again. After all channel buffers have been marked as free, the whole buffer is free to ingest samples from the ADC again. This design allows for calling code to be quite simple, looking more or less like this:
uint8_t *buf = nullptr;size_t sz = 0;size_t channel = 0;while (condition) { // `sz` and `channel` are reference parameters in `swap_buffer` adc::swap_buffer(&buf, sz, channel); if (buf != nullptr) { // do stuff }}Any new samples will be picked up ASAP due to the main loop code busy waiting until a buffer has become available. In the meantime, interrupts will trigger sampling to happen in interrupt context. This worked super well, and allowed for sampling at a much higher rate than the previous recording library we used!
Recording Module
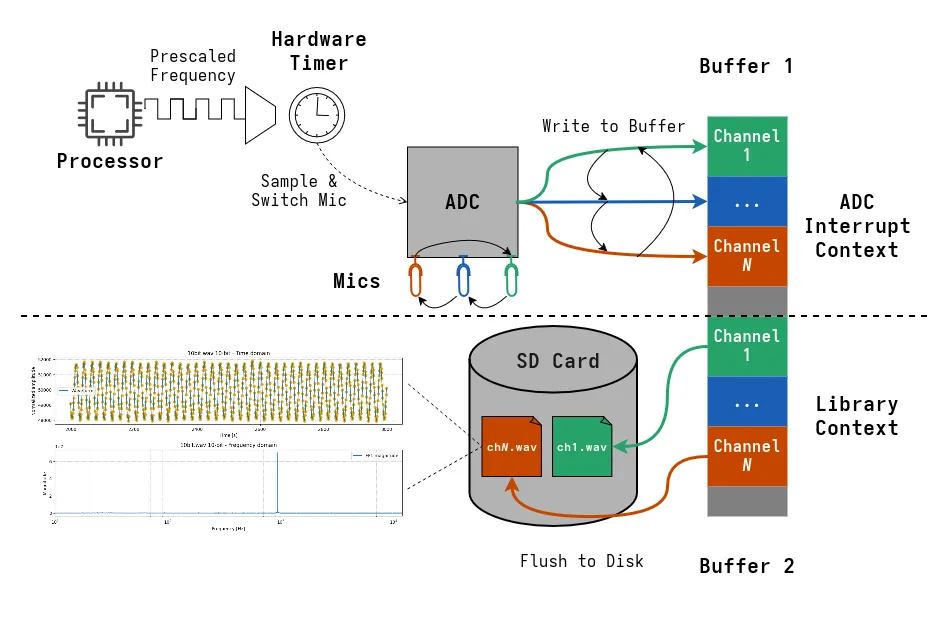
The recording module is pretty simple compared to the previous one. As input, it takes an array of channels to record on, filenames for each channel to save a WAV file to, and a sample rate to use. During recording, the main loop behaves exactly like the code example from earlier. Each retrieved buffer gets written to its respective channel’s file. At the end of the recording timeframe, a WAV header is constructed and written at the beginning of the file.
A diagram showcasing what the entire recording pipeline looks like is given below.
Open Sourcing It
After completing the core functionality of the library I had a shocking thought. For the first time perhaps ever, I had made a piece of software which could be useful to someone other than me! While this library was made specifically to solve my needs, it is reasonable to assume there are other people out there who may be interested in achieving similar things. I’ve been working on getting everything ready for a public release, including a doxygen page and some example programs showcasing the API. Currently, an alpha version is available on platformio with intentions to also release a package for the Arduino IDE.
Closing / Future Plans
This has been a super fun project to work on! It’s been very empowering to spot a bottleneck with our current approach, implement my own solution, and have it not only work but also outperform what we were previously using. Through the process of developing chrispy, I’ve developed technical expertise with hardware timers, ADC operation, and designing for high-performance in a resource-constrained environment. While working to make it a proper open source project, I’ve also gotten to work with Doxygen for transforming annotated source code into nicely formatted documentation and Github workflows to use CI/CD to automatically deploy documentation to Github pages.
My immediate goals with the library are to make it more user-friendly by enriching example programs/videos, extending documentation, and making it as easily available via package managers as possible. Future features will include signal processing techniques for enhancing audio quality. I would also be interested in developing additional backends for the platform-specific parts of the library to support a larger number of platforms.
Thanks for sticking around to the end! If you have any questions, comments, or suggestions (especially regarding this project) please email me at jordanbourdeau03@outlook.com.
Cheers!
- Jordan